
Tips and Techniques
1. Tips to Help You When Working With Quick Sil
Quick Sil can be a valuable asset to you and your patients, and is generally very easy to use. These tips will help you to further improve the ease of use and quality of devices which you produce using Quick Sil.
Some of the many uses for this unique technology include:
|
Orthotic Modifications
|
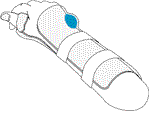
Distal End Pads
|
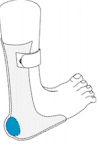
Posterior Calcaneal Relief
|
Ulnar Styloid Relief
|
Proper preparation is important:
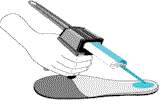
- After removing the seal or plugs on the cartridge tip apply light pressure to the trigger of the pressure gun to ensure that silicone is coming out of both channels. If not, clear the channels with the tip of a knife. Then attach the static mixer. Recheck for free flow before each use.
- Ensure that the Quick Sil is flowing through the static mixer evenly. Quick Sil Shore A 2, will be a light blue if mixed properly, while Quick Sil Shore A 7-10, will be light green.
Extend the shelf life of your Quick Sil cartridges:
- Store the cartridges in a refrigerator until ready to use, then bring to room temperature before using.
- After using, leave the static mixer attached to the cartridge until the next use. This keeps the cartridge sealed and limits the possibility of cross contamination.
Use the self leveling feature of Quick Sil to help you:
- If filling a shallow cavity or depression with Quick Sil, do not overfill. The viscous liquid silicone will have a high point in the middle that will level out in a few seconds to create a flat surface.
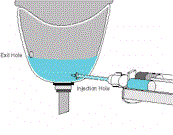
- If filling a deep cavity for a distal end pad, experience has shown that an entry hole under the residual limb and an exit hole at the preferred height will yield the best results when combined with the self leveling feature of Quick Sil.
2. Using Primer to Allow Quick Sil to Adhere to Devices
Silicone is a wonderful material to use for orthotic and prosthetic applications. Unfortunately, it doesn't adhere to anything. With proper use of our Quick Prime, you can get Quick Sil to stick to most materials.
Proper use is essential
- Ensure that surface on which this will be applied is clean and abraded to ensure good adhesion. Place a small amount of Part A(white) on the mixing plate and place an equal of Part B(blue) approximately 1 cm apart. Mix the two parts together with the supplied pallet knife until they are thoroughly mixed ( approx. 20 seconds).
- Apply a small amount of combined primer at the tip of the supplied brush and immediately paint onto the surface to be primed. Apply Quick Sil in approx. 2 to 3 minutes and allow combination to vulcanize.
- Vulcanization time varies from material to material so allow sufficient time for this to cure before dispensing. While strength of bond is generally good after approx. 15 minutes, complete vulcanization generally takes 4 to 16 hours, so avoid initial high stress on the bond.
Common pitfalls
- Poor bonding characteristics generally result from improper or inadequate preparation of the substrate or waiting too long to apply Quick Sil after the primer has been applied.
- Also be careful not to contaminate your Quick Prime. This can reduce its effectiveness.
3. Attaching Cured Silicone to Devices
Silicone adhesive (available at a local hardware store) can also be used for adhering cured silicone to another material. Many formulations of cured silicone can be adhered to another substrate using basic adhesiontechniques For example, if you desired to more permanently adhere a cured temporary Quick Sil relief area into a UCOkork foot orthotic base:
The above principle can be used when applying many cured silicones to other types of devices.
- Simply remove the Quick Sil piece from its cavity.
- Abrade and clean the cavity in the UCOkork base.
- Apply a thin coat of silicone adhesive to the two surfaces.
- Wait one minute and press the Quick Sil piece back into the cavity.
- If the piece is installed into the bottom of the orthotic, it will be ready to use in approx. 15 minutes.
- Best cure will be after waiting 24 hours
The above principle can be used when applying many cured silicones to other types of devices.
