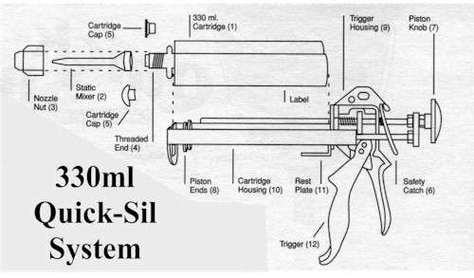
How to load the 330ml. Mixing Gun
To prepare the 330 ml. dual cartridge (1) for loading into the mixing gun it is best to install the static mixer (2) before loading. To achieve this, unscrew the cartridge nozzle nut (3) from the threaded end (4) of the cartridge and temporarily remove. Pull out the two cartridge sealing caps (5) and SAVE THESE SEALING CAPS for use when storing cartridge. Wipe any residue or spill over off the cartridge openings and slide the 330 ml. static mixer (2) over the end of the cartridge. Reinstall the cartridge nozzle nut (3) over the static mixer (2) and screw securely onto the threaded end(4) of the cartridge. The cartridge is now ready to load. Push the safety catch (6) on the mixing gun forward and pull the piston rod knob (7) back until the piston ends (8)are back against the trigger housing (9). Place the 330ml. dual cartridge (1) into the cartridge housing (10), with the Quick-Sil label down against the cartridge rest plate (II). Gently pull on the trigger (12) so that the piston ends are in the cartridge openings and are applying light pressure against the cartridge base. The 330 ml. Quick-Sil 5 minute Silicone System is now ready to use.
Instructions for Use
For Distal End Pads:Position the residual limb in the prosthetic socket.Estimate the approximate height of the pad required.Remove the limb from socket and position patient in parallel bars if weight bearing is desired. Drill entry and exit holes at the desired position in the socket.Place the weight bearing residual limb, covered by a protective wrap or balloon, in the socket and immediately inject Quick-Sil into the lower (entry)hole. Pump until the distal end of the limb is surrounded by silicone and Quick-Sil starts to drip from the top (exit) hole. Allow Quick-Sil to cure for 5 minutes before removing limb from socket.The pad may also be created by injecting Quick-Sil into the top of the socket until it reaches just below the desired level. Immediately place the residual limb,covered by a protective wrap or balloon, into the socket and allow the Quick-Sil to form around the distal end of the limb while under pressure from weight bearing.The Quick-Sil will displace upwards with weight-bearing to create total contact. Allow Quick-Sil to cure for 5 minutes before removing limb from socket.
|
When a More Permanent Bond is Required:
UCO's QuickPrime adhesive primer allows the practitioner to adhere Quick-Sil to many other materials. Surface preparation is a critical component of this procedure. First, the contact surface must be roughened. Next, make sure that the surface is dry and free of dust or grease.Squeeze a few drops of Part A onto a mixing plate,squeeze an equal amount of Part B on the mixing plate near the drops of Part A. Mix the two parts together thoroughly for approximately 10-15 seconds, using a small spatula or palette knife. DO NOT MIX TOGETHER until you are ready to apply QuickPrime. After mixing, IMMEDIATELY paint onto surface that you wish to adhere Quick-Sil. Use a stiff brush to apply a thin even coat. Complete spreading of QuickPrime within 25 seconds. Allow QuickPrime to cure for approximately 5 minutes, or until completely dry. Then inject Quick-Sil, which will bond firmly to the primed surface.
|
Shelf life:
Unopened Quick-Sil may be stored in a cool, dry place for approximately one to three years.Once opened, cap tightly and store for up to six months. UCO recommends storing in refrigerator. Bring to room temperature before use.
|


